Posts mit dem Label yarn werden angezeigt. Alle Posts anzeigen

Samstag, 28. Januar 2017

My African Flower Soccer Ball for Michelangelo!

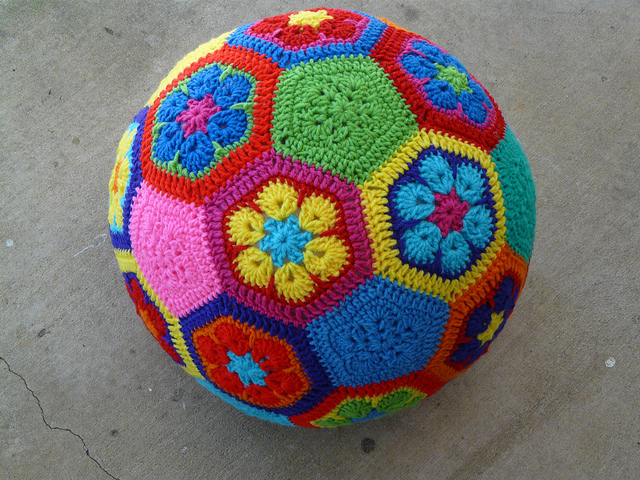
Gwenda is 16 days old now & we were both pretty surprised 
how big this football has become!
We thought it would be average football size
but wow:
Almost as big as the little princess Gwenda!

Dada Neon Crochet Football soccer ball

I always wanted to make such a ball since 
I discovered the pattern by Crochetbug!
Just so pretty!

Click here to find the pattern!
It's so easy, after some hexagons & pentagons
you don't need the pattern anymore!
Just perfect for a fresh Mami like me
with a lack of sleep & a baby brain!
You still get some pieces done half asleep
in between two breastfeeds!


We were invited to Gwenda's first party today:
Our friend Michelangelo has celebrated his first birthday
& I think I really picked the perfect pattern
for his present.
The kids were throwing it,
squashing it,
used it as a pillow
or were just jumping around on it!
Mami & Daddy will have to make another one
for the first birthday of our little princess!

Crochet Baby Ball Dada Neon Crochet

I used Stylecraft Special DK yarns for this ball.
The actual challenge of this project was to create
the pentagons & hexagons in a way
that the border colours are different
while attaching.
I recommend crocheting them together as you go!
I've used the visible join method,
makes quite a nice contrast! ;-)

Crochet Football

I hope you are all doing fine
& I'm sending much love to all
my princesses & princes!

Your friend Dada!

Dienstag, 26. April 2016

My massive crochet Nana!

Last year I already posted a pic of my huge Nana doll
but I still have to show you some more pics
& have to add some details...

Just in case someone else needs such 
a lovely giant Nana!
8 kg of pure joy!

 Crochet doll

What you need is:

A 20 mm hook

Loads of yarn & stuffing

by Nadelspiel by Elizzza!

by Dada Neon

This pretty Nana goddess is quite heavy:
8 kilogram of yarn & stuffing.
Depending on the thickness of the yarns I've used
I crocheted with 6-8 skeins at a time...

Nana by Dada Neon Crochet

Whenever one of the yarns came to it's end 
I just knotted another yarn to it...
A fantastic way to get rid of scrap yarn
or colours you actually don't like.
(Yay, I don't have any brown yarn anymore!)

and Dada Neon

You don't need to go to the gym anymore
while working on such a massive sexy Lady:
I can tell you it makes strong muscles
because the Nana is getting so heavy
after a while!

Dada Neon Crochet

My massive Nana is pretty proud of her curves,
my Nanas are always pretty confused
in general when I tell them that 
many human beings don't wanna have curves at all
& make strange things like strict diets.
When my Nanas see photos of thin supermodels
they are always getting pretty concerned
& they wanna feed these Ladies.
I find my Nanas are pretty clever! ;-)

Nana by Dada Neon Crochet

You are really willing to
crochet such a beautiful Lady as well?!
PLEASE post a pic
to my Facebook page!

Sending massive Nana hugs:

Your friend Dada!

Mittwoch, 19. August 2015

My first experience with a hand spindle!

I wanted to try spinning since years!
Last year I got me a spinning wheel
& I washed & prepared 3 kg of fluffy sheep wool
a while ago...

3 kg of sheep wool for spinning

...first I read a lot about spinning.
Some experienced bloggers
wrote that it's best to start with a hand spindle first.
I got me one & tried it with video tutorials.
To be honest: I don't like watching videos
to learn something new...
I'm not very patient
& it's just so much easier to learn
it from someone else!

I googled & really!
I found someone who teaches spinning in Leipzig!
Sister Gudrun is such a lovely Lady
& the Kreativstube is just a wonderful place!
Creative people meet here
to felt, knit, crochet, craft or spin!

Some other Ladies wanted to learn to spin
with a hand spindle as well
& it was really nice to have company
while spinning my first "pregnant worms"! :-)

hand spindle

The sister's order of sister Gudrun
owns own sheep
& so their nice soft yarn turned into
my first irregular wool!
I don't mind my yarn isn't perfect,
it takes some training to spin & to get the right feeling.

At home I went on spinning
(so addictive!)
with some colourful merino wool
& that's how it looks like:


Spinning with colourful wool
is so much fun!

Another photo to show my imperfection
a little bit closer:


I'm excited to improve my skills on the hand spindle
& next week I can learn to spin
with a spinning wheel!

And here a last photo of my first handspun yarn
with Nana Sheila:


Sending love:
Dada & the Nanas!
♥♥♥

Dienstag, 10. März 2015

Yarn Bowl Tutorial! - By Malena Casey

What a wonderful idea!
My friend Malena (MariaElena)
 has made this gorgeous Yarn Bowl
& she was so lovely to write down a tutorial!
 It's such a good thing to have
- no yarn mess anymore
while we are crocheting!
(And also a good way to rescue
our yarn from playing dogs & cats!)
So here it comes:
MariaElena's first tutorial, yay! ;-)

♥♥♥ ♥♥♥ ♥♥♥


YOU WILL NEED:

A round Paper Mache Box
 

&
a pencil
a cardboard knife
sandpaper
white glue
all purpose sealer
water based Latex (mate)
some yarn & a hook
acrylic colors
Acrylic sealer/Finisher
 

First you draw with a pencil the shape of the cut you want 
and then cut it out with exacto or cardboard knife 
or anything else that will work for your box. 
Then you sand the opening edges with fine sandpaper 
until even and smooth and brush them with white glue. 
When it's dry run your finger through the edge 
to see if it needs more sanding. 
Apply a second coat of white glue and let it dry.
Now you apply a coat of all purpose sealer to the whole box, 
let dry and apply a second coat, 
sanding with a very fine sand paper in between.


Paint the box with water based Latex (mate), 
2 coats, sanding lightly in between. 
Now you can sponge a contrasting color, 
or paint whatever you would like, 
or maybe do some decoupage.... its your choice! 
I used a sea sponge and crafts acrylic paint 
and just dabbed some on the box. 
I painted a a border at the bottom and the edges on top, 
including the opening.


When you are satisfied with your decorations, 
apply 2 more coats of sealer. 
When the sealer was  totally dry, 
I rubbed the whole thing with a gel stain, 
very lightly and cleaning immediately, to give it an aged patina.  
I also made a crochet chain with matching cotton yarn 
and glued it to the upper border and opening. 
You can also use a glue gun.
Now you can spray your pretty bowl with an acrylic sealer/finisher 
and let dry overnight. 
Enjoy!! ❤️❤️❤️


♥♥♥ ♥♥♥ ♥♥♥ 

 Malena (MariaElena) & Dada are curious persons,
so if you have made your own Yarn Bowl
please post a picture
I will add your work to this blogpost as well!

 You have a fantastic idea,
written down a wonderful pattern
but you don't have a blog or webpage?
Don't be shy, we are all here to inspire us
& I will happily share your unique ideas here!