Montag, 26. Mai 2014

YOUR Personal Freeform CAL! - Week 2


You are visiting this blog for the first time 
& you want to start YOUR Personal Freeform CAL? 
It's never to late to begin, 

Before I start I have to say "Thank you!" to our members Jodie & Roberta 
for sharing photos of their projects. 
It means so much to me to know I'm doing this project not only for myself!
All of us have a different style & taste in colours, 
can't wait to see YOUR Personal Freeform CAL grow! Stay awesome!

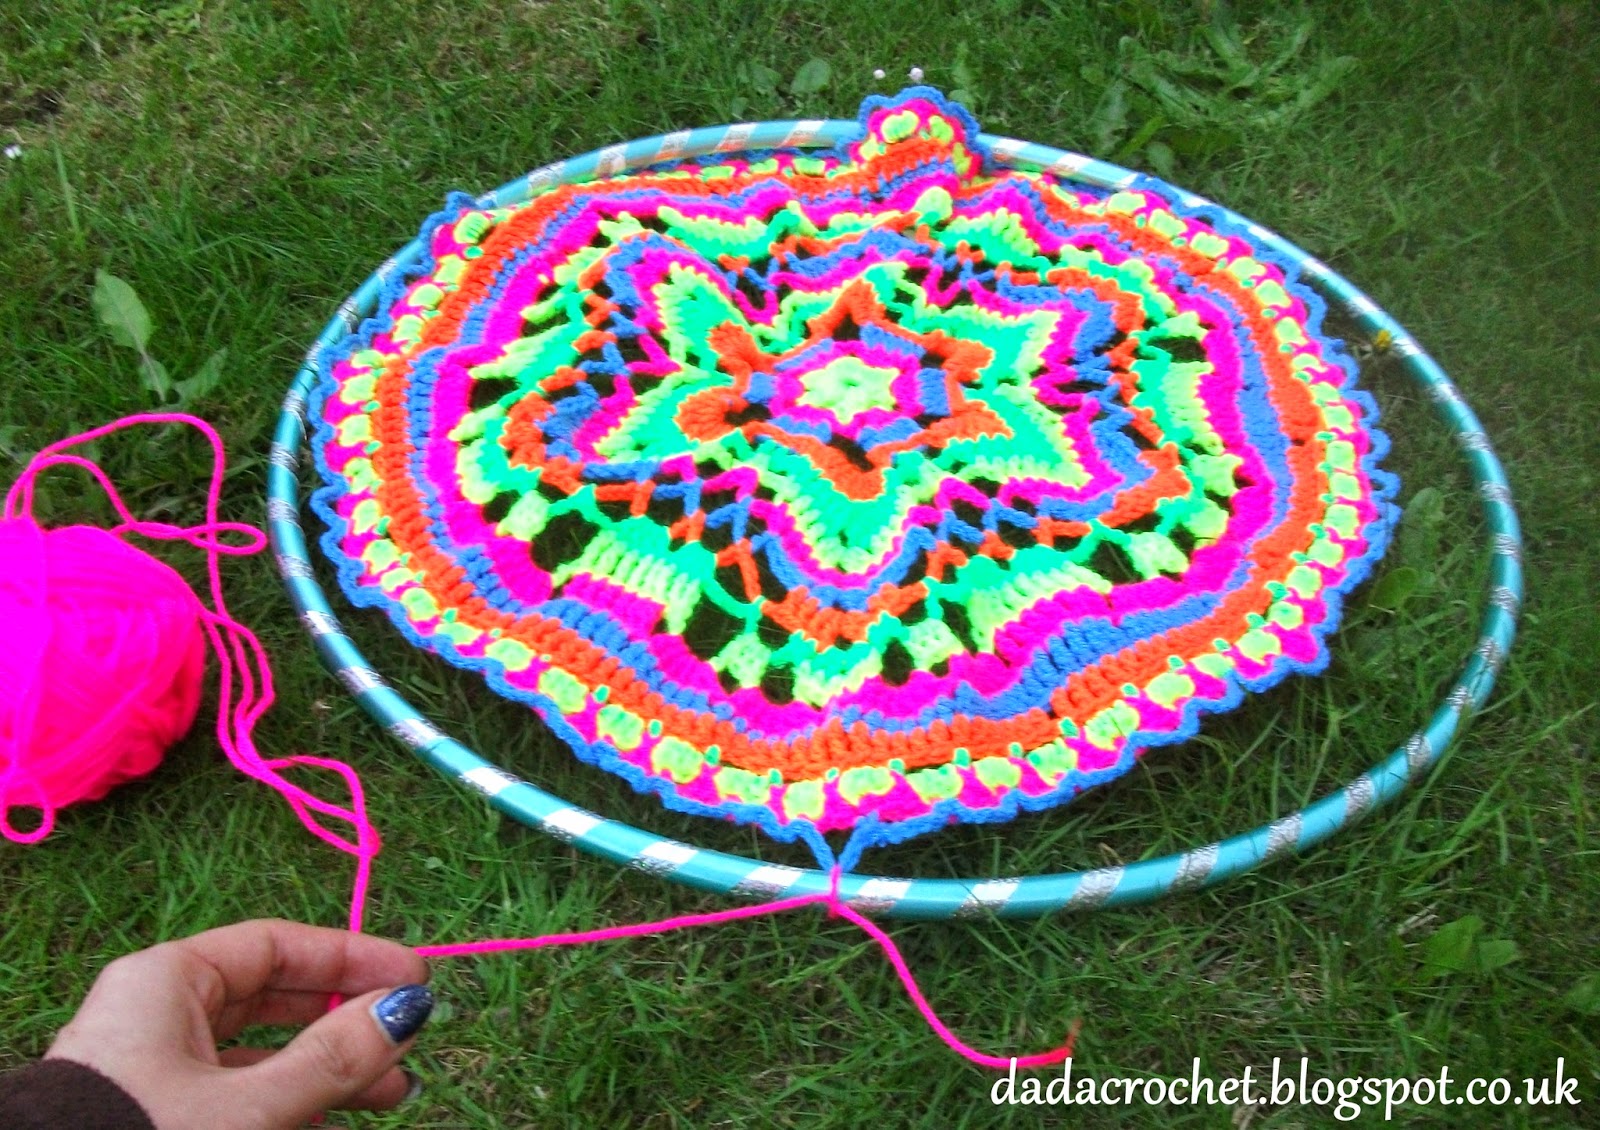
This week we will celebrate our hands!


We are not slaves to the rules & patterns &
we can do magic with our hands & hooks!
This makes us special.
And never forget:
We're doing art, not perfection!
(It's not an easy project -
if you struggle with your hand project
just go for this wonderful pattern
by Susan Regalia:

Take a sheet of paper,
draw around one of your hands.
Choose a colour on the spur of a moment!
Take a hook (I took a 3,5mm hook)!
Try to paint your hand with wool!
I've used the double crochet stitch (US: single crochet)
Where the hand grows wider, we double the stitch 
in the beginning or the end of a row; 
It's getting thinner? Crochet the first or the last two stitches of a row together...


You've completed your hand? Congrats! To improve the edge: Slip stitches around your hand!
Just to present you Fluff, the sleeping cat:


So glad I've finished this part of our adventure!
(My hands are extraordinary huge, took me more time than expected!)


You are wearing something like a wedding ring?
A friendship ring?
Just a ring?
Create one & put it on a finger!
I've created mine in this way: Chain 10, Slip Stitch, a row of double crochet stitches (US: single crochet), ss

Begin to crochet around! Create hills (except between the fingers)!


The roots of our fingers are already quite close to each other - where they almost touch each other:
Crochet them together.
Crochet around one more time!

Create chain stitches in a contrast colour!
Sew a spiral, a heart, whatever on your hand!


Fluffy wool is the way to go! If you don't have fluffy wool, take another special yarn!


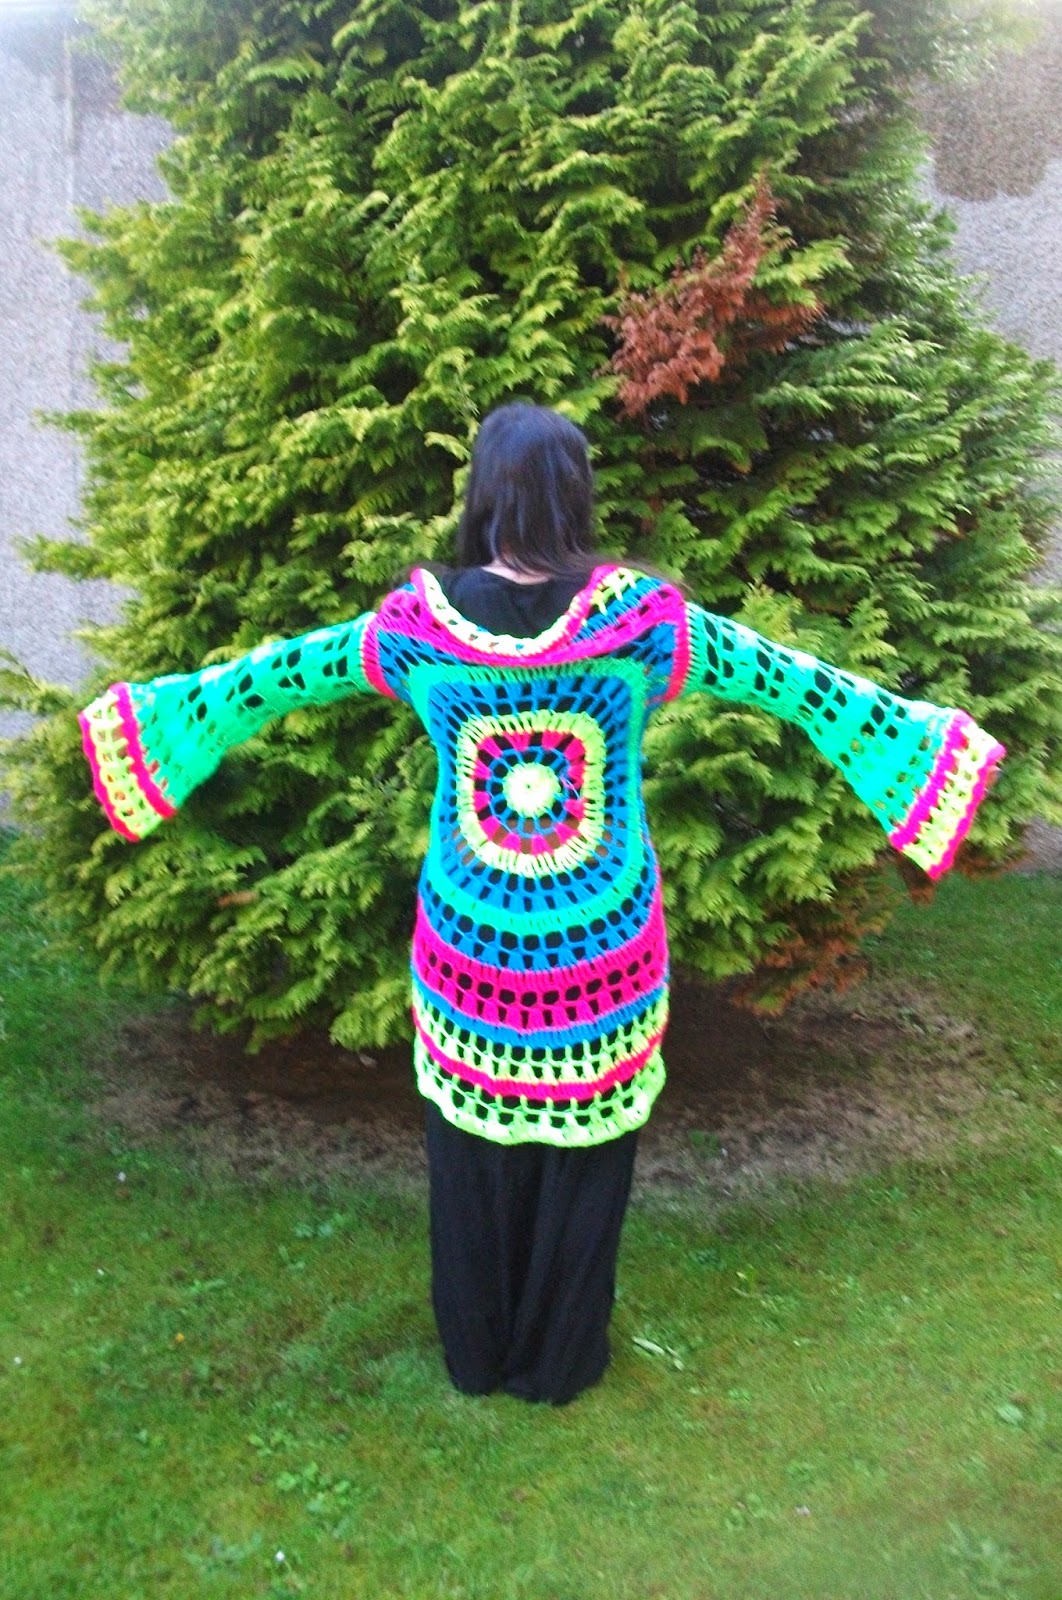
Puzzle your pieces together!
(I damn like the combination of black & white! So I've used both colours for crocheting them together. 
It makes lovely effects if you just play around a little bit with two different colours...)
I've used buttons as finger nails - You have another idea? Wonderful, go for it!
It's YOUR Personal Freeform CAL, not mine ;-)


Your project gets wavy? Fantastic, we will create 3 dimensional waves! How to? The next picture will show you ONE way to do it...


Just combine the wave on it's root!


In the end I just went on with black & white quite spontaneously, 
double crochet (US: Single Crochet), treble (US: double crochet), deep stitches... 
Express yourself! Play around!
A few hills in the end in a contrast colour are helpful 
to reconstruct the chronological order in your future blanket...
(Actually it's already a blanket! A tiny one!)


Comments & pictures are making my day!
Share your projects on Ravelry or send me photos in a message on Facebook!

Montag, 19. Mai 2014

YOUR Personal Freeform CAL! - Week 1

Have you ever tried Freeform Crochet? Some of you for sure, others may already have seen breathtaking photos of the creations made by Prudence MapstoneOf Mars or the Freeform Fashion designer Mizzie Morawez


This project will be something special.
We will create art.
We will create beauty.
And none of our Freeform CALs will look the same in the end.
Our CAL will more & more tell a story, YOUR story.

If we really want to create art, we have to leave the structures & patterns,
our hook will be our brush.
We will paint a huge picture,
we will even write something down on this blanket.

Using pattern gives you kind of a safety but crocheters who never leave this structure, can't get the wonderful feeling of doing something unique.

While creating this Freeform CAL we'll let our work grow like a plant,
we will get a better feeling for the yarn itself.
We will leave control behind, sometimes even about the colour.

Get yourself all your scrap yarn, fluffy wool and let it glitter! 
Share your Personal Freeform CAL with us & send me your pictures!
I will also publish the weekly piece of freeform as a pattern in Ravelry & hopefully our creations will look more & more different.

Let the adventure begin!

Use your favourite hook size, have a look at your collection of wool & ask your inner child: What's your favourite colour? It's the beginning of something really personal, so the first stitch should already imply and express yourself. 

Foundation: Chain 3, 7x double crochet (US: single crochet) in first chain, ss in the first double crochet (US: single crochet)


Row 1: Start a new colour, double every stitch of the Foundation (14 stitches)


Row 2: Double every second stitch, build a few "hills" between the stitches while crocheting for example a treble (US: double crochet) followed by 2 double treble (US: treble) in one stitch - find your way back to the row by crocheting 2 double crochet (US: single crochet) in the second double treble (US: treble). Of course you can also use another way!


Row 3: try to double every 3rd stitch in this row; use double crochet (US: single crochet), interrupt the stitches with a few deep stitches to cross the colour of the last row - as often you want to


Only two stitches left? Chain 5, crochet back with for example 2 double crochet (US: single crochet) and 4 treble (US: double crochet), ss in first stitch, don't change the wool


Row 4: double every 4th stitch or so while crocheting around, feel free to create hills!


Row 5: Use a fluffy wool and crochet around while you double every 5th stitch or so (if you don't have one use multicoloured wool, if you don't have one, just combine two different wools)


Row 6: Close your eyes and make a "blind" colour choice or ask your children, partner or friends to decide - build a few hills, use other colours to create hills until the fluffy row is covered


Last row: Chose a yarn you favour and crochet around with different stitches, double some stitches (feel your wool, it talks to you: sometimes it's time to double a stitch or to skip one)


Congrats: You've just crocheted a worldwide unique piece of art - the first part of YOUR Personal Freeform CAL!


My name is Dada Neon, I'm glad you want to share this special project with me & you will join me again next monday!


Be free to share your first work on Ravelry or on Facebook!


Sonntag, 18. Mai 2014

Create your own wall hanging Mandala!


Obviously crocheting Mandalas is quite popular nowadays - but what to do with all these wonderful creations? Today I'm presenting you a way to make a wall hanging Mandala. Easy to create but definetely an eyecatcher! 


For this wall hanging Mandala you need:

a 4,5mm hook

Double knitting wool like New Fashion DK by Woolcraft or Stylecraft DK

the Starflower Mandala pattern created by Zooty Owl

a 60 cm hula hoop (for small children)

white glue


While crocheting check the size of your Mandala before you start to crochet the last rows - in the end my mandala measured 57 cm. This wall hanging mandala should be 3-5 cm smaller in the end than the hula hoop... Your Mandala has reached the suitable size before you have completed the pattern? It will look fantastic even without the last low (...and I'm already quite sure it's not possible to crochet only one - too addictive!).


Now there is nothing left to do but making knots - be free to do it your way, I've made my first knot and made the second one on the other side of the hula hoop - all in all 16 knots.


I've used different neon colours - of course you can also use only one colour. Why don't you just take your favourite colour of the Starflower Mandala?


In the end I took white glue on the backside of the wall hanging...


I would be pleased to see pictures of YOUR versions!


Donnerstag, 15. Mai 2014

My personal Freeform Crochet CAL...

Have you ever heard about a thing called CAL?
When you're totally into crocheting for sure,
a lot of these "Crochet along" projects
offer one granny square pattern or one special row a week -
in the end you should have a beautiful blanket.
The most popular CAL at the moment is Moogly's Crochet along project, I guess.
On the next picture you can see my Freeform-Crochet-CAL after week 7...


I moved from Germany to Scotland last year with my best friend Stephan.
A few month ago we realised that our german language skills are decreasing.
So we've started our german-speaking-evening.
Every sunday we are visiting a traditional scottish pub
with live music in Aberdeen,
for listening to scottish and irish folk songs - while talking german
& creating one more crocheted piece for our Freeform-Crochetalong-Blanket.
After 7 weeks it has reached the size of a big pillow
- many wonderful evenings to crochet along!


It's a friendship blanket & we are creating it together: 
I'm crocheting, Stephan decides which colour to crochet next. 
A wonderful method to integrate your non-crocheting friends or partners into your project!


Actually Freeform Crochet & a real CAL project would be a strange combination.
If you use a pattern you can't really call it Freeform anymore...


I will just start a Freeform-CAL project in a few days 
- every week I'll create a new freeformed piece 
& will also show you how to crochet it in general. 
Just for the inspiration - I won't offer complete patterns, 
in the end it should be YOUR personal piece of freeform art.


Would be amazing if there are people out there 
who are joining my Freeform CAL... 
Can't wait to see it grow! 
So: Who is willing to join this adventure?

Mittwoch, 14. Mai 2014

Scrap Yarn Blanket - Get yourself a huge crochet hook!

So much fun to crochet was this multicoloured project! Maria posted on her blog Keeping It Stepford a way to get rid of scrap yarn caused by former projects: You can make colourful blankets just by using a huge hook & a lot of yarn. How to make your own Scrap blanket? Follow this link...


The basketweave stitch is actually so easy to crochet but makes such nice effects. The best thing is that you can create it pretty fast. My blanket was finished in less than a week...


...the secret is a huge hook! I took a 9 mm crochet hook for this project. If I would make another one (already created in the future...) I would take a 12 mm hook - and much more neon colours and glitter wool!


In the end the blanket wasn't big enough for me. Stretched it by creating a frame with a thick wool in the end.


It was so lovely to see how the colour combinations were developing... When one of the scrap wools came to an end, I just took the next colour. I didn't start to think about the colours much. Actually I was glad  to get rid of a few colours I don't like much - but even grey and brown yarns really look nice with this technique.


What are you doing with your old yarns?

Samstag, 10. Mai 2014

Mandalas for Yarndale!

I was so excited when I read Lucy's blogpost she published a few days ago on her blog attic24. She asked her readers to take part in a woolly collective for a special decoration for the Yarndale Festival this year. I've moved to the UK last year so hopefully I'll find a way to go there this year in September... Already fell in love with the beautiful mandala patterns created by Zooty Owl, for the Yarndale Festival mandala I've used Lucy's Mandala Wheel pattern.

That's my mandala for Yarndale!


Used a 4,5 mm hook, so I haven't crocheted the pattern until the end... So easy and fast to create! Actually I really don't like using patterns for my projects - this mandalas make a difference because you don't have to follow the pattern constantly. You repeat the same stitches again and again - for one row. Finally I've reached the 7 inches. Now it could have been ready to glue the back of the mandala. Somehow I wasn't satisfied...


So many people will join this mandala production, will I find my own one if I'm joining the Yarndale Festival? I suppose, there won't be too many mandalas in neon colours (a woolstore in Aberdeen has a special offer at the moment -Woolcraft New Fashion DK in neon colours - had to buy some packages). Used multicoloured bottoms to make a difference ;-)


Worked with white glue and a toothbrush on the back of the mandala...


...ready to send it away! Anyone out there who is joining this mandala for Yarndale event? What are you doing to make your mandala unique?


Donnerstag, 8. Mai 2014

Neon party dress!


...this uv-reflecting dress is based on the free pattern of DROPS design. Actually it should have become a circle jacket. Decided to change it into a dress in the end...


How much I love neon coloured wool! On party's with blacklight it's just impressive!


It was a pretty fast crochet project - completed it within a few days ;-)


Brought so many bright colours into my life...


...but this world needs more colours, what do you think?


Mittwoch, 7. Mai 2014

Zooty Owl's Rainbow Vermicelli Mandala - as a jacket!

The Mandala feaver has catched me! Zooty Owl has offered the crocheting community an amazing free pattern - The Rainbow Vermicelli Mandala pattern... Actually my version of this mandala is caused by my newest addiction: Huge crocheting hooks ;-) Started this pattern with a 12 mm hook. It grew and grew... Finally I've decided to create a coat out of it.


To be honest: I'm feeling like a princess while wearing this Mandala coat ;-) I've used cheap acrylic double knitting wool - two of a colour at once to make the wool a little bit thicker.


I've created the arms with the double crochet stitch and the treble stitch.


I guess it won't be my last crocheted mandala coat... Already created in the future ;-) Why are there always so many projects on my mind?