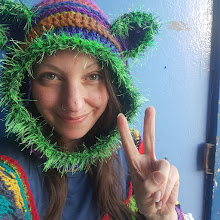
A few month ago I've presented you my first
coat based on the Vermicelli Mandala Pattern of Zooty Owl!!!
Of course everyone wants such a fabulous coat as well, I know.
Readers of my blog might know that I have moved back
from Scotland to Germany - quite spontaneously!
I've started crocheting another coat in Scotland
& also wrote down the tutorial until the arm part in Scottland.
Actually already a Rainbow Vermicelli Mandala Vest!
In two weeks my wonderful friend Chris from Scotland
will visit me & bring me my Coat WIP,
then I can show you how to create the arms
to make a Coat of the Vest!
But ATTENTION:
You have to be your own designer concerning the size of your arms
but it's not difficult...
You need:
Zooty Owl's pattern Rainbow Vermicelli Mandala
A 12mm hook
DK yarn (for example by Stylecraft or Woolcraft New Fashion) - 2 of one colour
Buttons
A 12mm hook
DK yarn (for example by Stylecraft or Woolcraft New Fashion) - 2 of one colour
Buttons
We take two strings at once and use the delicious "Rainbow Vermicelli Mandala" recipe...
...we go on...
... until we've completed row 13!!!
Now we have to create the foundation for the sleeves.
It's time to be your own Designer!
You have to find your ideal number of chains.
It's not only a case of your size but also depending on your way to crochet:
tight or loose stitches are making a huge difference!
My first Rainbow Vermicelli Mandala Coat is bigger,
because I've crocheted it in a loose way.
(I wasn't used to the huge hook!)
Join the yarn wherever you want, make chains (I needed 15),
skip the number of chains & ss into the following stitch of row 13.
Try it!
Has your arm enough space to move?
You can always make the arms tighter in the end but not wider!
(It doesn't fit? Go on with the pattern for a few more rows until it works;
we are princesses & princes because we are creating our own world
while doing magic with our hooks,
not because we need a little bit more or less space!)
Repeat this a second time - with a space between the arms, of course.
Try it! (I skipped 21 stitches)
It should already look like a half vest now...
Go on with row 14, treat the arm chains as your row 13.
Go on until row 20 (Try your Vest sometimes, some of you may need a few rows less!)
This time I've crocheted with the 12mm hook much tighter,
already ready to create the arms after row 20...
This time I have to create one more row!
I'm crocheting an alternative 21st row:
3 ch in one of the stitches of row 20 (counts as first US-dc or UK-treble),
then one dc (UK treble) in every stitch.
Repeat this row until your Vest fits you.
[I've added a border by using one of my favourite stitch combinations:
*2 treble (US dc) - skip 2 - 5 treble (US: dc) in following stitch - skip 2*]
...but do it your way! ;-)
Now you should already have a Rainbow Vermicelli Mandala Vest!
You want a Coat?
The arm part will follow as soon as I have my Vest in Germany!
The scottish rain wouldn't allow me to take sunny pictures ;-)
Ohhh, I'm one of the most curious persons on this planet,
so if you create your own Vest
please show a photo!
Zelna loves to upload pictures of your creations
on her Zooty Owl Facebook page as well! ;-)


It is fantastic Julia! I feel so honored that you used my mandala in this wonderful creation of yours! xxxxx Zelna
AntwortenLöschennice creativity
AntwortenLöschen