Alex & me had so much
fun making & baking
our own personal hook sets!
Crochet hooks with a polymer clay handle
are quite often to find on etsy
- for ONE hook you sometimes pay more than 20 Euro!
Some hooks are really worth it
because real polymer clay artists
have made a real outstanding hook.
But even you have never worked
with polymer clay:
You can create your own art hooks yourself
- even ergonomic hooks
which often cost so much money!
This is a real low budget project,
you will need:
- Aluminium foil (for the ergonomic hooks)
- Polymer Clay (We have used the brand "Fimo")
- Nail art polymer clay sticks
- REAL cheap hook sets
(Search for "colourful crochet hook set"
on amazon, ours have only
cost 2 Euro for 12 hooks!)
- an oven
I've bought these four "Fimo" colours,
blue & purple
have even glitter within!
("Fimo effects")
By accident I've seen
these cheap nail art sticks
on amazon...
You get them in sets of 50 or 100 sticks
for a little money.
And they last for thousands of
decorated crochet hooks! :-)
(Just search for "Nail art polymer clay sticks")
First a look at the pretty hook set
Alex has made!
For this hooks you
only need polymer clay,
a hook set
& an oven!
For his handles he used a brilliant technique
by Donna Wolfe from Naztazia!
It's a real good video
if you wanna go for this technique as well!
He has used more than 2 colours
as you can see here:
After he wrapped & rolled this
multicoloured "sausage"
he cut it into little pieces
& attached these tiny bits
to his hook:
Then he just rolled it on an even surface...
& then they came into the oven!
(Fimo needs 130 °C for 20 minutes)
And look how happy he is
about his fabulous selfmade hook set! :-)
I was experimenting quite a lot,
none of my hooks looks the same, yay!
I will show you close ups now
& explain how I made my hooks!
Alex was so kind to help me:
The Polymer Clay Nail Art set
has included a cutter
& so he cut REAL thin decorations
for my hook handles!
***
This was my first hook:
I'm crocheting most of my projects
with a 4,5 mm hook
so it needed to be an thick ergonomic one!
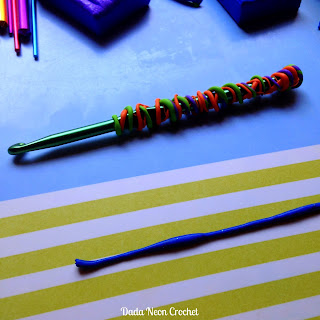
To save polymer clay
I wrapped aluminium foil
around the hook.
I've also wrapped together
polymer clay in purple,
neon green & neon orange...
& I simply wrapped it around
the foil & pressed the fimo
with my fingers...
And because I love flowers
I added some in the end!
I just pressed them onto the fimo!
***
The next ones were really simple to do:
Basically I just wrapped the hooks
in fimo (quite thick!),
rolled them
& have pressed the tiny flowers
& smileys
on the fimo with a tweezer!
That's it! ;-)
***
The next one was this flower hook:
After I've covered this hook in fimo
& rolled it to give it a regular shape
I've put little fimo balls on it:
And then I just rolled it
with my hands
on a flat surface again!
There are prettier flowers
on this planet but
for an experiment they
look pretty nice! :-)
***
I really love how this ergonomic hook
feels while crocheting
& I think I will make more
of these!
I simply formed a foil ball
with my hands
and wrapped it with fimo.
Roll it in your hands
& take sharp scissors...
...you can just stick the balls
on your hook now!
In the end I formed a spike with
aluminium foil
on the end of the hook
& kneaded fimo around...
***
Loads of psychedelic fried eggs!
I don't have progress pics
but I just covered the hook with purple,
rolled it until the shape was perfect,
added little balls of neon green,
rolled it again
& added even tinier orange balls
to the center of the green spots.
Roll it again & have fun!
***
The hook on the left was covered
by Alex for me!
(I was just so much slower than him, haha!)
The other three are easy to create...
I just formed "worms" of fimo with my hands,
wrapped them around
& rolled the hook with my hands!
***
If you cover the hook sizes
with polymer clay don't forget
to add the size
with a needle before baking!
(Or like Alex:
Write the sizes on the hooks
after baking with
a permanent marker!)
All these hooks were baked in the oven
at 130 °C for 20 minutes
but check the details
on the package of your polymer clay!
My friend Lisbeth has also made
polymer clay hooks
a while ago & has made these pretty
personal hooks!
She also added the hook sizes
with a needle!
It's great to inspire each other,
when you make a personal set
of hooks now as well
send me a photo on Facebook!
I will just add your work to this blogpost here! ;-)
I loved playing around with fimo,
so many possibilities!
Just experiment with your fantasy
& find out funny new techniques! ;-)
Sending love & greets:
Dada (or Julia)


